You might be wondering why I’m putting a sewing tutorial on my photography website. Well, with the arrival of the coronavirus pandemic, we’re all having to do some unusual things. 😀 There is a massive shortage of masks – even for those who need them most, like our healthcare workers. Like many of you, my work has been affected by the pandemic, so while I’m home I decided to do what I could to help. So I asked my friends who are healthcare workers if they could use washable fabric masks. The answer was a resounding yes, so if you’re willing to make some, please ask around in your area to see who needs them. If you don’t know anyone in a medical field but your city has a local group on Facebook, post there or on Nextdoor. I guarantee you will find someone who needs these!

PLEASE READ these important notes before moving on to the instructions:
- Disclaimer: these masks are not N95 masks and do not qualify as PPE (healthcare workers will know what this means). However, the CDC has altered their requirements (click here for the link) due to the extreme shortage of masks, and has said that homemade masks such as bandannas or scarves can be used as a last resort. These fabric masks can be worn alone or over a disposable mask to hopefully help prolong its use by keeping it from getting dirty on the outside from repeatedly touching it. These masks will NOT filter out coronavirus microbes. But they can help healthcare workers who work in low-risk departments conserve N95 masks for their co-workers who work with patients who have (or are suspected to have) contagious diseases. The masks can help healthcare workers who have NO masks at all. We’re in a “it’s better than nothing” situation here, people.
- Before making the masks, I spoke to my friend Erin (who is a surgical nurse) about a popular mask tutorial that’s going around on Facebook, and asked her what features she and her co-workers would need/want in a mask so I could modify the pattern if she needed something different. She said it’s good if the mask is tall enough to go up under your chin a bit while still covering your nose, and pleats are needed to give space for you to talk without the mask touching your mouth. So I took the specs from two masks (a disposable one I had at home, plus one that Erin uses in the OR) and combined them to try to create one mask that could be used for many purposes. Half her co-workers like masks that tie, the other half like ear loops, so I’m providing instructions for both types. The masks are sized to fit most adults.
- I strongly suggest using a smooth cotton fabric (such as quilting cotton) for your masks. It’s soft, easy to care for and generally a safe choice for people with sensitivities. The tutorial I mentioned above suggests cotton flannel for the lining/inside of the mask, but Erin thought it would be really hard to breathe through. After trying on these masks multiple times for fit purposes, I also think flannel would get pretty hot. No matter what you use, it needs to be machine washable and dryer safe. Gender neutral prints are a plus!
- If you want to make masks with ear loops: narrow width flat elastic (1/4″ and under) is starting to get hard to come by because of the demand for these masks. If you can’t find any locally, try Etsy. You can also use cord elastic as long as it’s appropriate for sewing and is machine washable/dryer safe. Keep in mind that some cord elastics are quite firm and are hard to stretch, so you may need to use longer pieces to account for that. Cord elastic is also a little harder to work with because it likes to roll/slide out from under your sewing machine’s foot. If you can find narrow flat elastic, use that. It’s much easier.
- If you want to make masks with ties: I tried several options for ties – twill tape, bias tape, and making my own ties out of fabric tubes. Twill tape and bias tape are the fastest and easiest since they’re premade (double fold bias tape does need to be sewn shut, while both tapes need their ends finished). Use caution when choosing materials for ties – I discussed this with the fabric guy at Joann, and he mentioned some grosgrain ribbons will not hold up to washing. If you use bias tape, make sure to get 1/2″ DOUBLE fold bias tape, not single fold.
- These instructions assume you have some basic sewing knowledge (for example, back stitching won’t be notated in the instructions, so you need to be aware of when you should be securing your stitches). The instructions also assume a 1/4″ seam allowance.
WHAT YOU WILL NEED:
LAYOUT OF MATERIALS: It’s difficult to show you exactly what’s happening when I have the fabric in the sewing machine, so the next two pictures are here just to help you see where all the pieces will be going. The masks are made inside out so we end up with nice finished edges, so you’ll start with your two pieces of fabric facing each other, right sides (printed sides) together. The elastic or ties (depending on which style you’re making) will be sewn between the two layers of fabric. If you were to put it all the layers together at once, it would look like this:
Hard to see what’s going on, right? The next picture is what it looks like if you take the topmost piece of fabric off. Note the attachment points are different if you’re using elastic compared to if you’re using ties. If you’re using elastic, the elastic gets attached to the sides of the mask fabric. If you’re using ties, the ties get attached to the top and bottom of the mask fabric. The ties are placed that way to mimic the masks Erin uses in the operating room.
INSTRUCTIONS: Now that you know where things are going to go, we can actually sew some stuff! Please read the instructions all the way through before starting.
1. If you’re making a mask with elastic, ignore this step and start at Step 2. 😀 If you’re making a mask with ties, skip to the bottom of this post to see how to prepare the twill or bias tape to use it for ties. When you’ve finished that, come back to this point and go on to Step 2.
2. No matter what style of mask you’re making, start with your two pieces of fabric placed one on top of the other, right sides together.
3. Starting at the center of the bottom edge of your fabric, sew along the edge toward one corner.
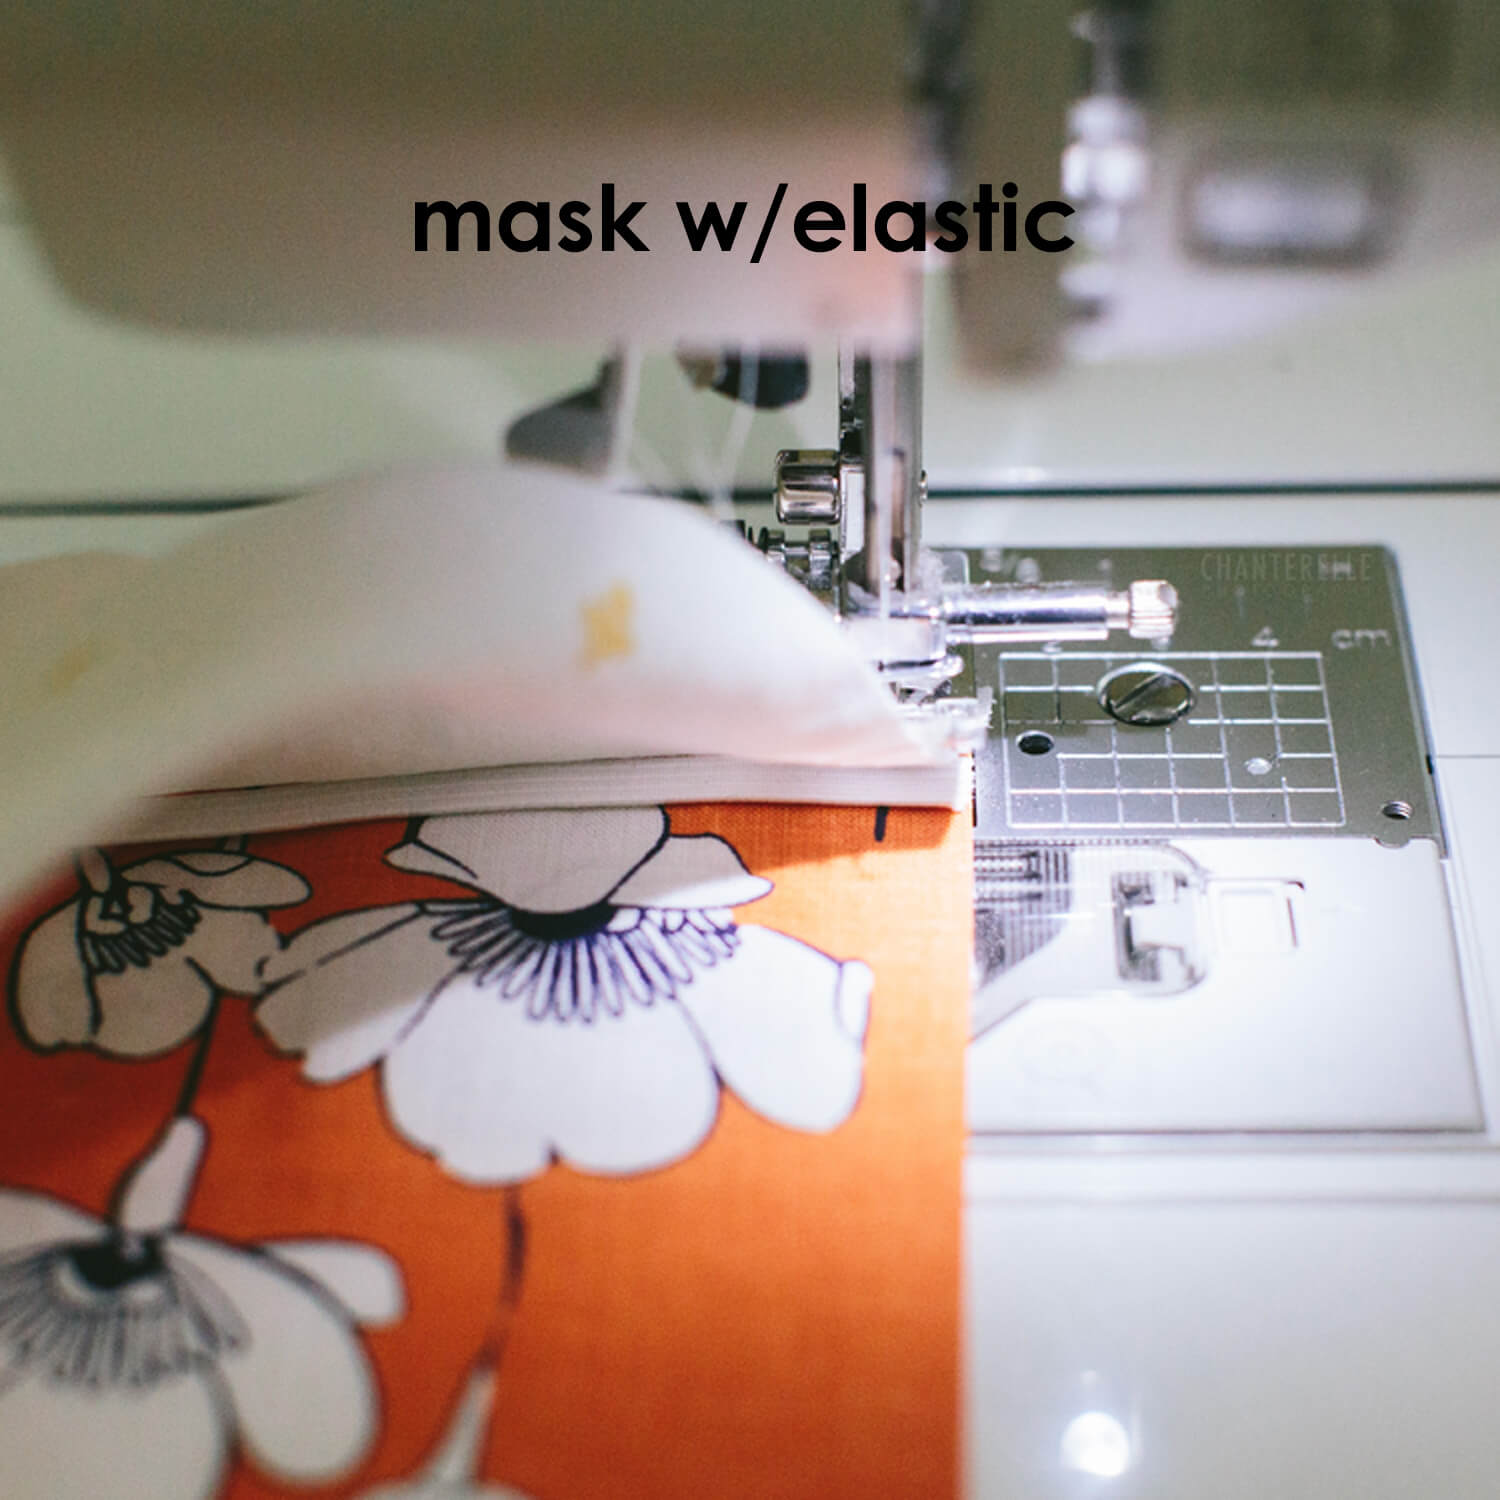
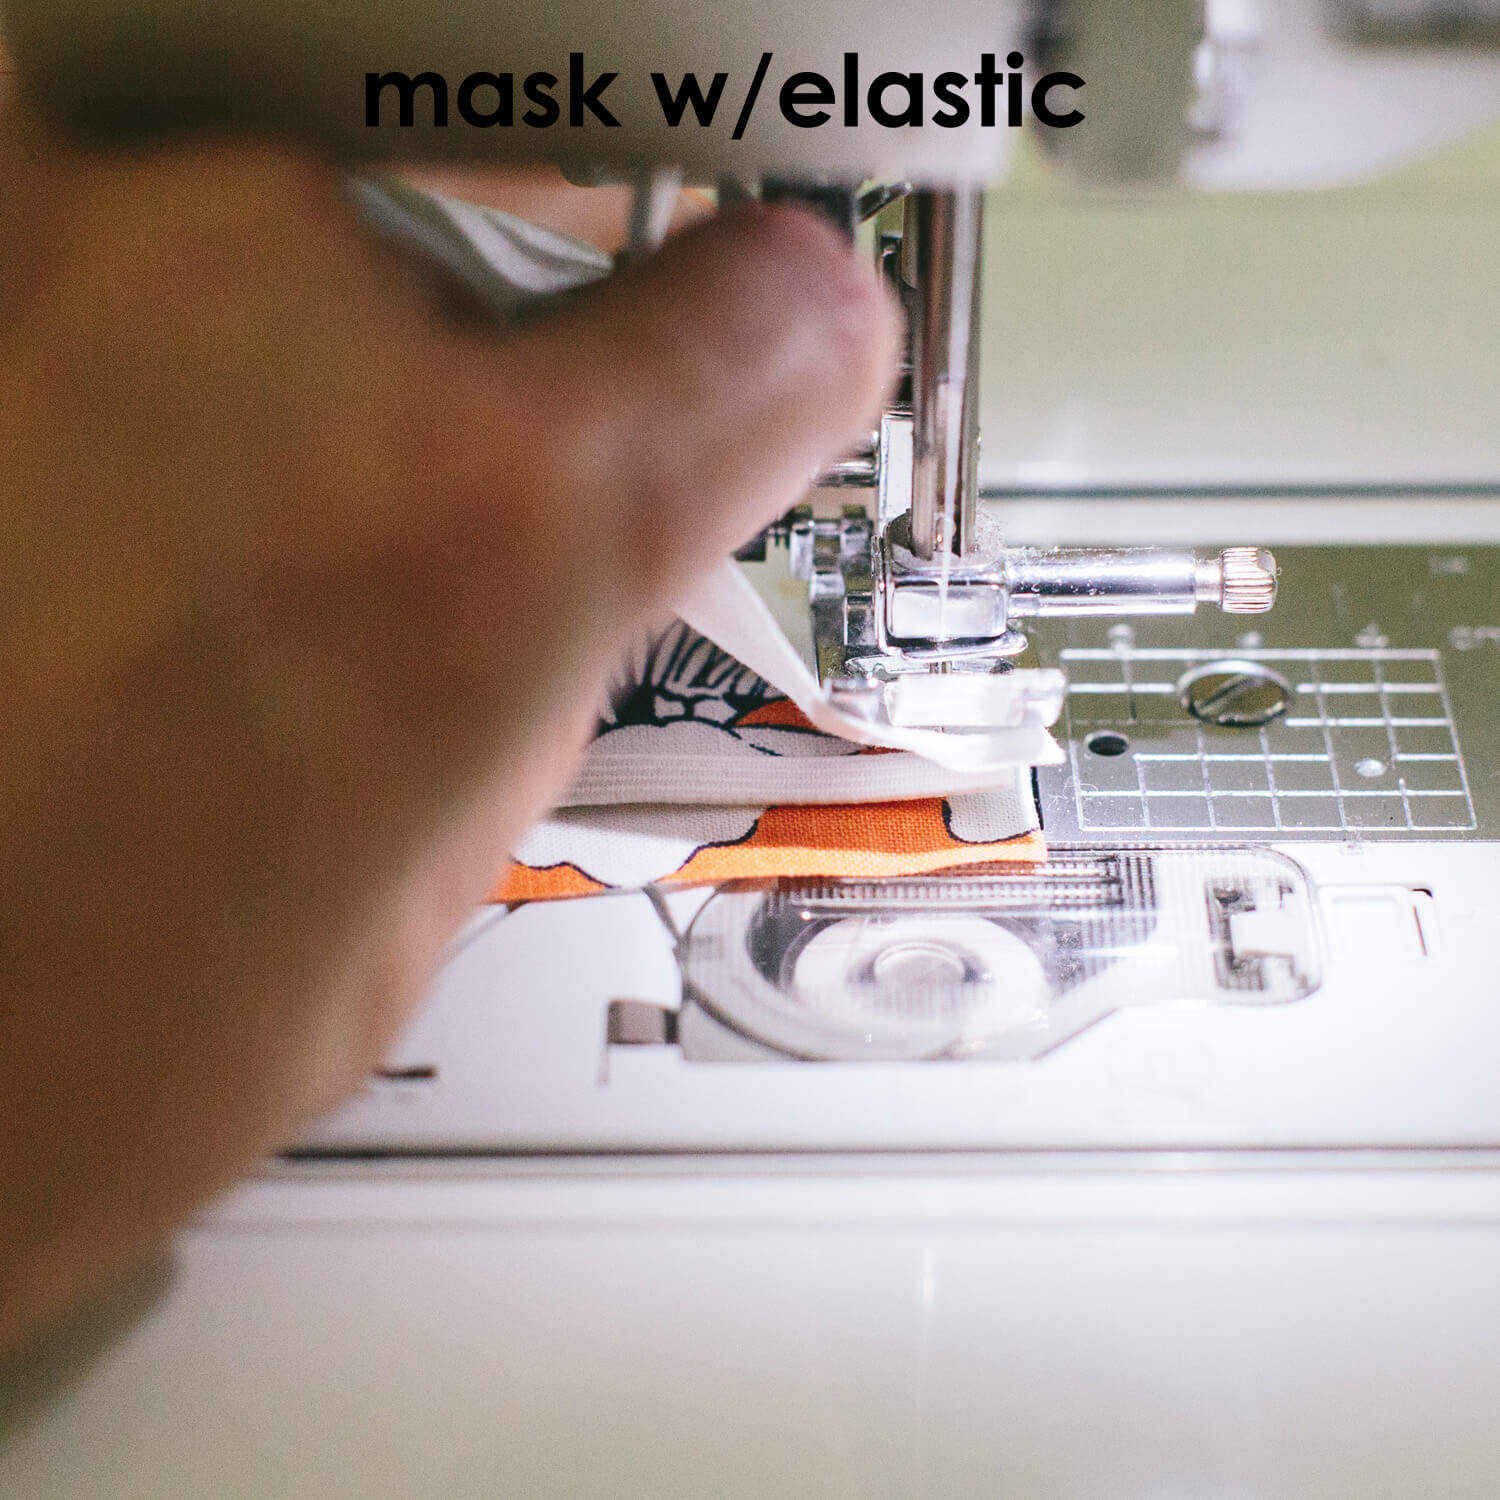
- 3a. If you’re making a mask with elastic: stop sewing about 1/4″ before you reach the edge of the fabric. Leave the needle in your fabric, lift the sewing machine’s foot, and turn your fabric 90 degrees. Place the end of one piece of elastic between the two pieces of fabric, butting it up against the needle. The end of the elastic should be flush with the right edge of the fabric (see photo below). Lower the foot, realign your fabric layers, then sew along the edge toward the next corner.
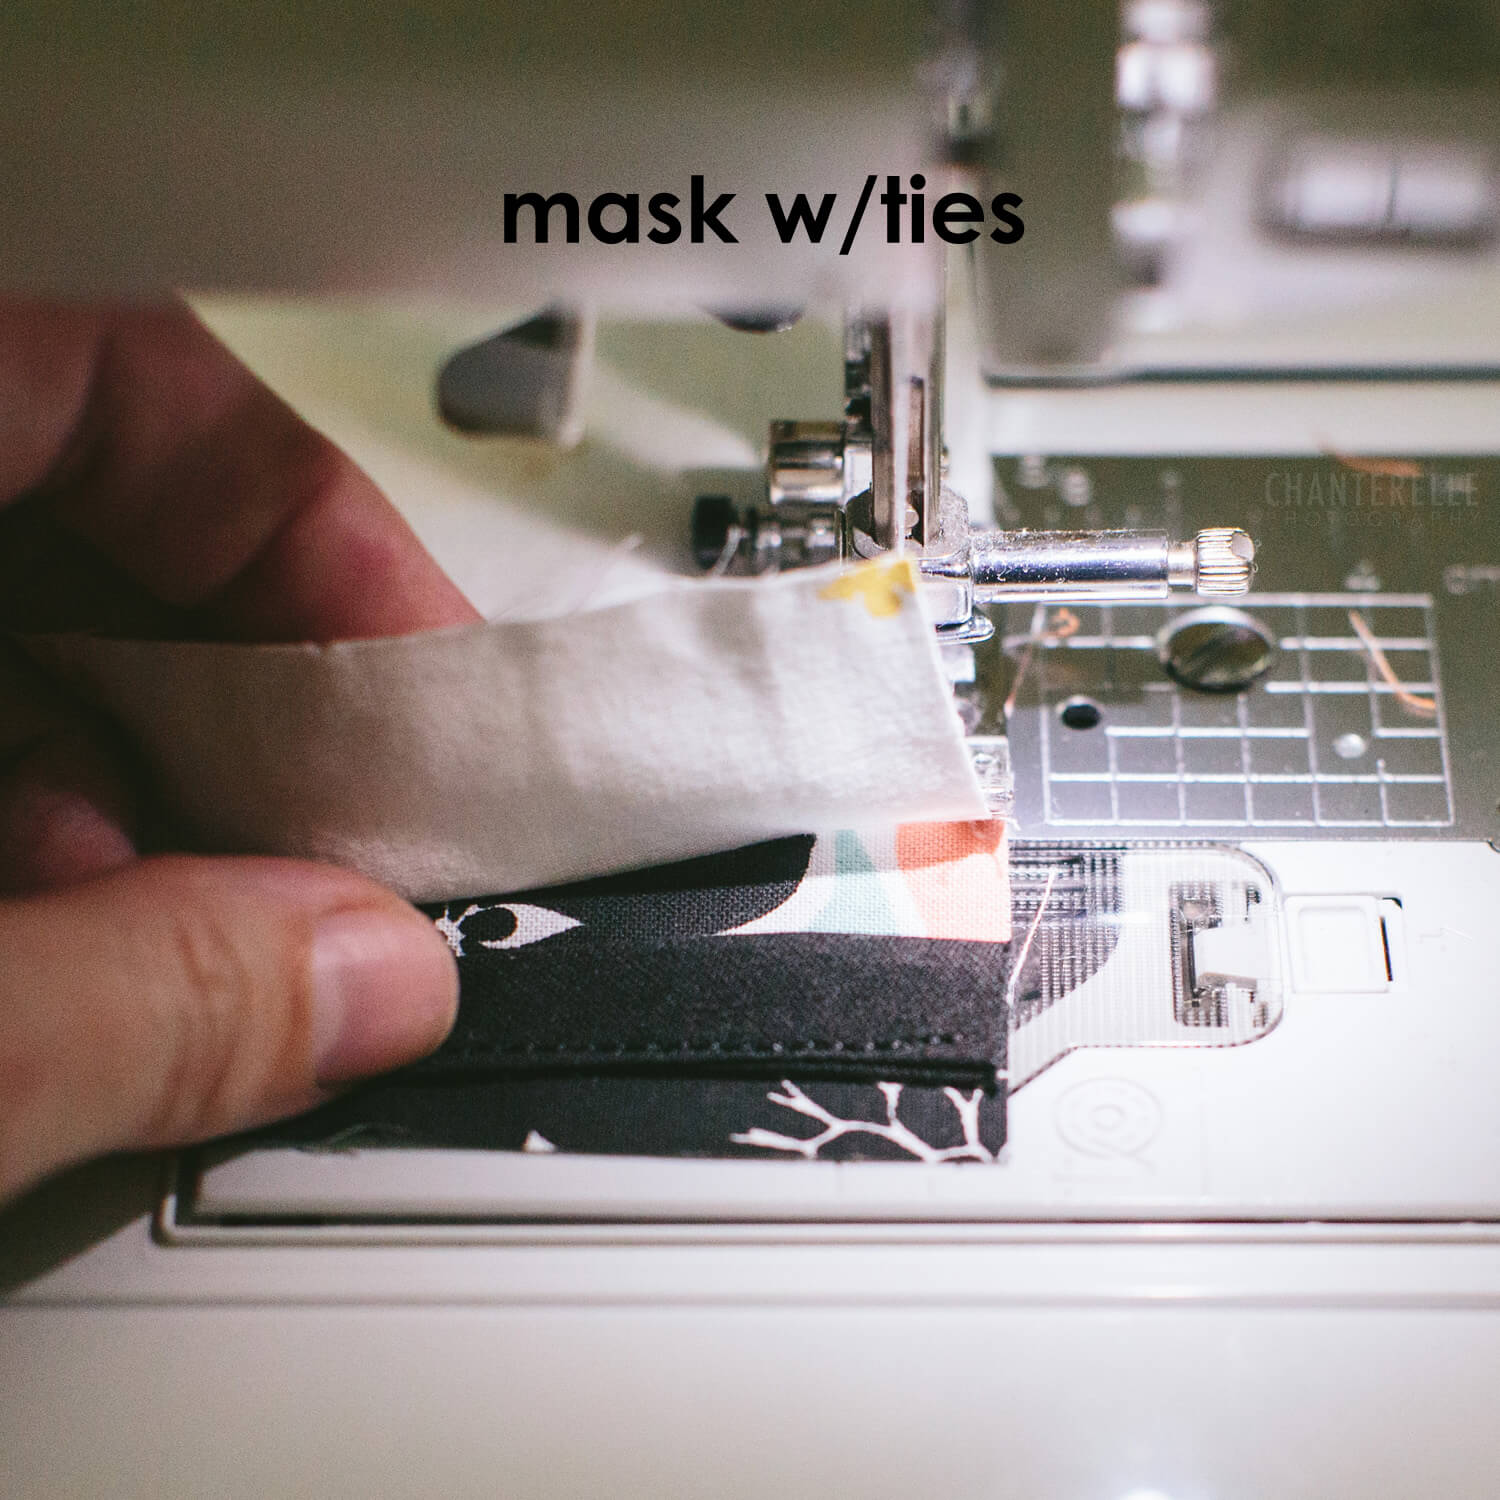
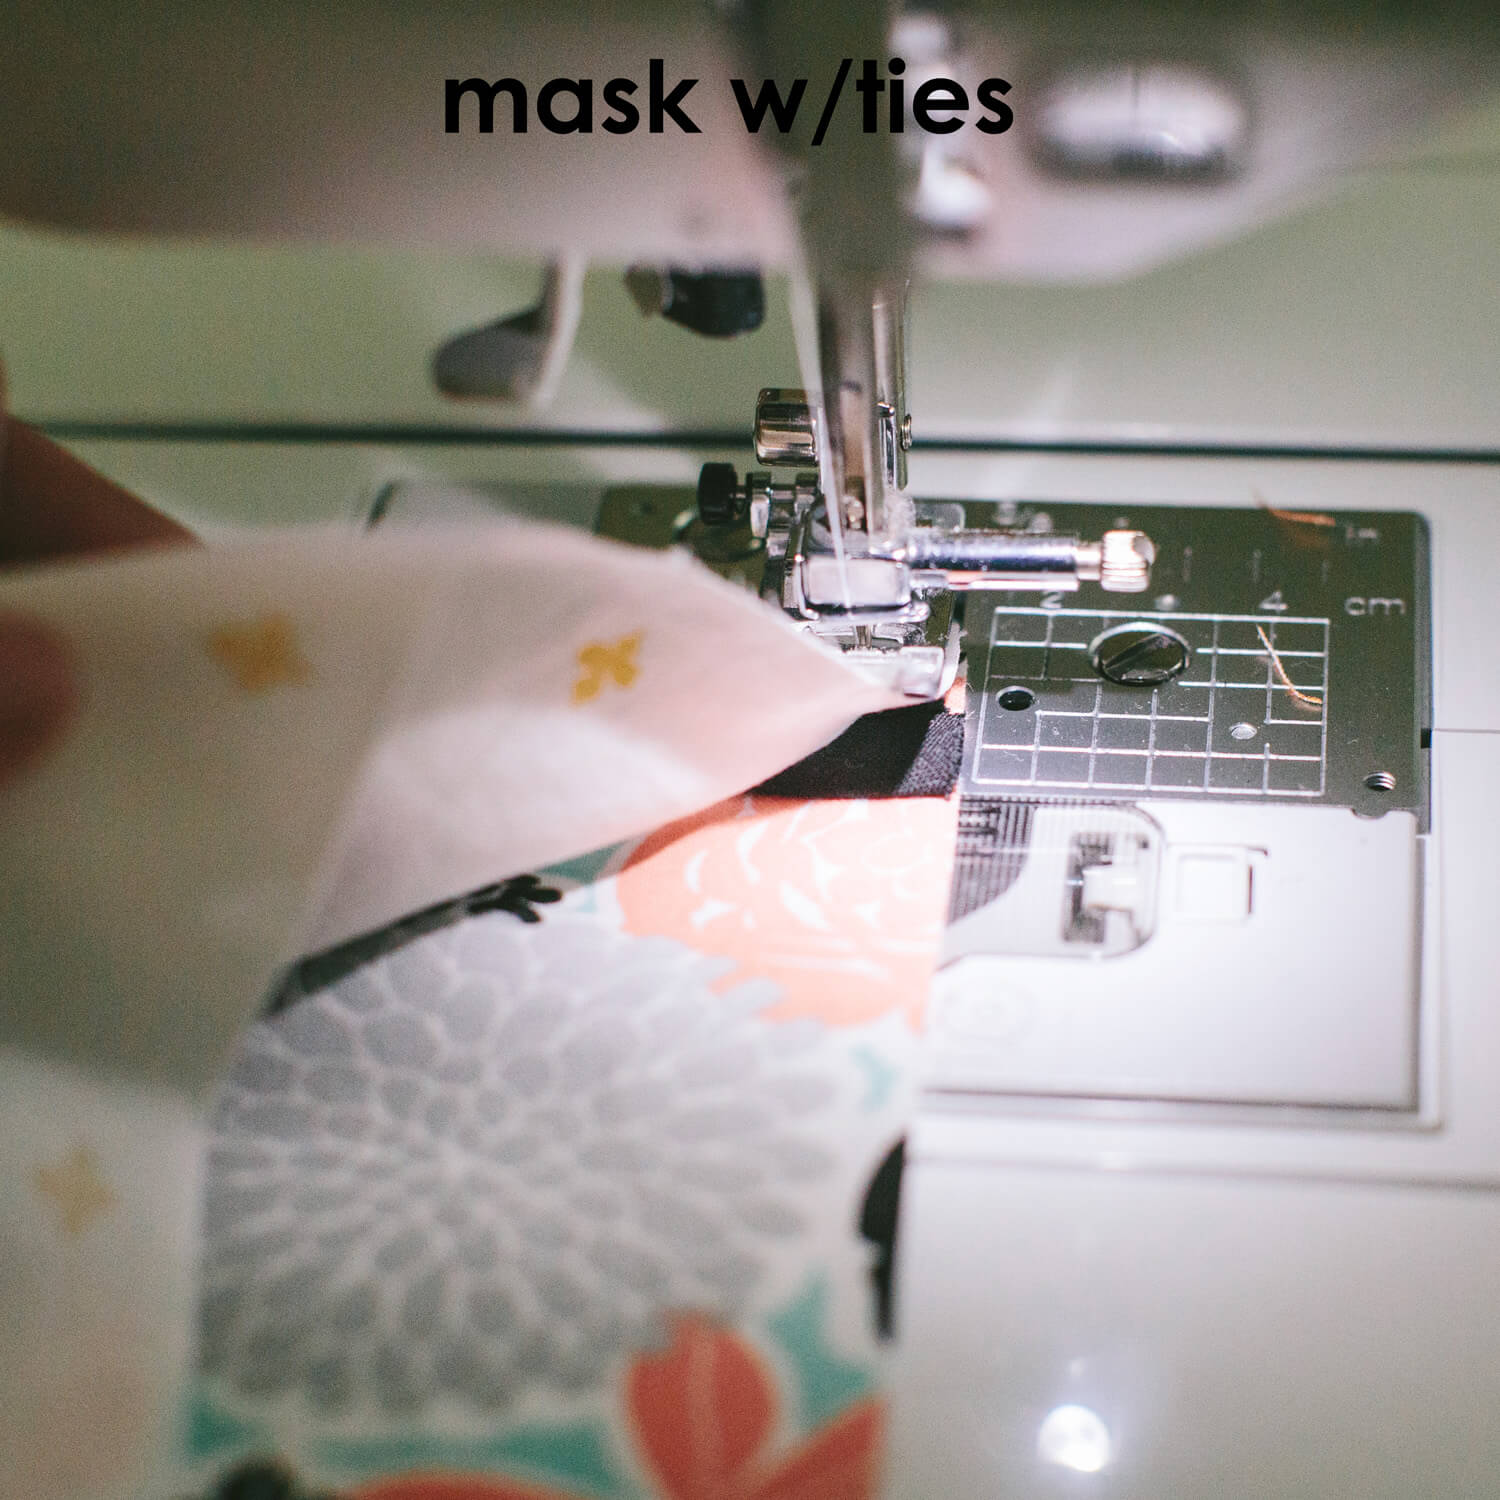
- 3b. If you’re making a mask with ties: stop sewing about 3/4″ before you reach the edge of the fabric. Place the unfinished end of one tie between the two pieces of fabric, about 1/4″ from the edge of the fabric closest to you. The end of the tie should be flush with the right edge of the fabric (see photo below). Realign your fabric layers and continue sewing toward the corner, stopping about 1/4″ before you reach the edge of the fabric. Leave the needle in your fabric, lift the sewing machine’s foot, and turn your fabric 90 degrees. Make sure the tie is not in the path of the needle, then lower the foot and continue sewing along the edge toward the next corner.
-
-
-
4. For corner #2:
- 4a. If you’re making a mask with elastic: stop sewing about 1/2″ before you reach the edge of the fabric (notice you are stopping sooner this time!). Leave the needle in your fabric and lift the sewing machine’s foot. Reach between the layers of fabric for the loose end of the piece of elastic you just attached. Place the elastic about 1/4″ from the edge of the fabric closest to you. The end of the elastic should be flush with the right edge of the fabric (see photo below). Lower the foot, realign your fabric layers, and continue to sew toward the corner, stopping about 1/4″ from the edge of the fabric. Leave the needle in your fabric, lift the sewing machine’s foot, and turn your fabric 90 degrees. Make sure the elastic is not in the path of the needle, then lower the foot and continue sewing along the edge toward the next corner.
- 4b. If you’re making a mask with ties: stop sewing about 1/4″ before you reach the edge of the fabric (notice you are sewing further before stopping this time!). Leave the needle in your fabric, lift the sewing machine’s foot, and turn your fabric 90 degrees. Place the unfinished end of another tie between the two pieces of fabric, butting it up against the needle. The end of the tie should be flush with the right edge of the fabric (see photo below). Lower the foot, realign your fabric layers (making sure the loose ends of the ties aren’t in the path of the needle) and sew along the edge toward the next corner.
-
-
5. For corner #3:
- 5a. If you’re making a mask with elastic: repeat step 3a.
- 5b. If you’re making a mask with ties: repeat step 3b.
6. For corner #4:
- 6a. If you’re making a mask with elastic: repeat step 4a, EXCEPT when you make the final turn, you’ll be sewing toward the area where you first started. Make sure you stop soon enough to leave a 1.5-2″ opening so you can turn your mask inside out (see photo below).
- 6b. If you’re making a mask with ties: repeat step 4b, EXCEPT when you realign your fabrics and start sewing toward the last corner, you’ll be sewing toward the area where you first started. Make sure you stop soon enough to leave a 1.5-2″ opening so you can turn your mask inside out (see photo below).
7. Turn your mask inside out (it should look similar to the ones in the picture below). At this point I like to give the mask a quick pressing with the iron. It’s not required, but it helps give you a neater result . If you’re making a mask with elastic, it probably won’t sit completely flat, even when pressed. Don’t worry, it’s not supposed to!
8. The remaining steps are done the same way on both types of masks. To add pleats: the bottom of the first pleat should be about 1.5″ from the bottom of your mask. I just eyeball the pleats, so you don’t have to measure and be super precise unless you want to. You need a total of 3 pleats, each one about 3/8″ wide, and they should be right up against each other (see photos below). If they’re not all EXACTLY the same size, it’s okay! You can just finger press the pleats and pin them, but an iron will help keep everything flat when you get to the machine. I find I don’t need to pin the pleats if I press them well enough. Your mask overall will be about 4″ tall if you’ve done the pleats correctly (give or take a 1/4″ since we’re eyeballing here).
Once you’ve finished folding the pleats, your mask will look something like this:
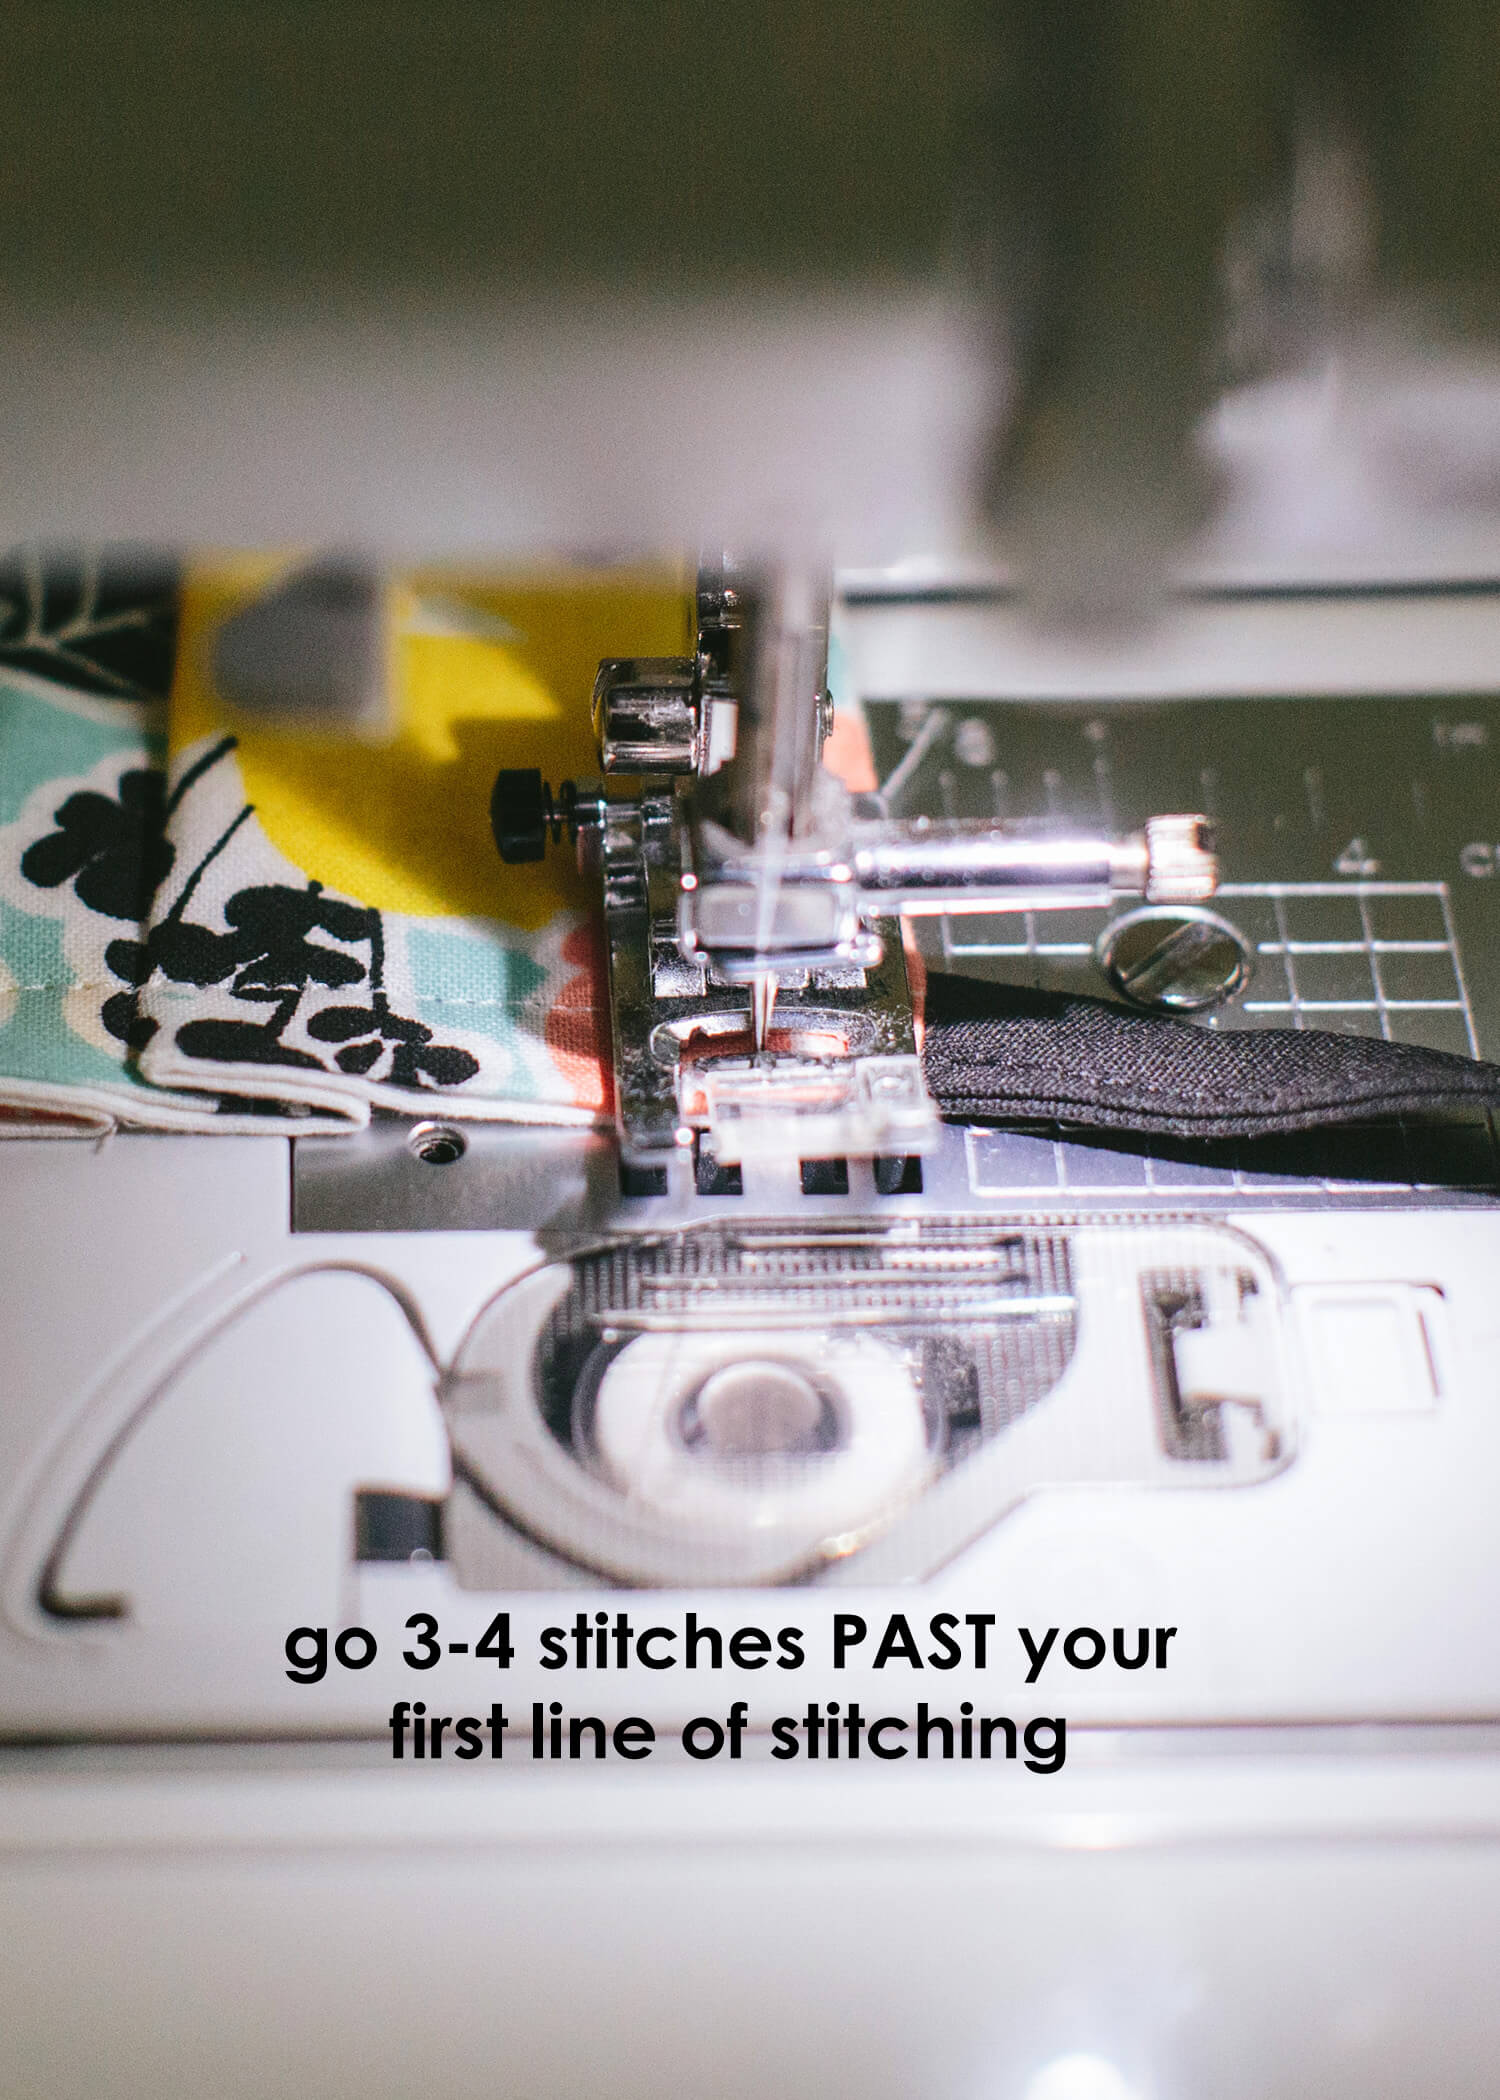
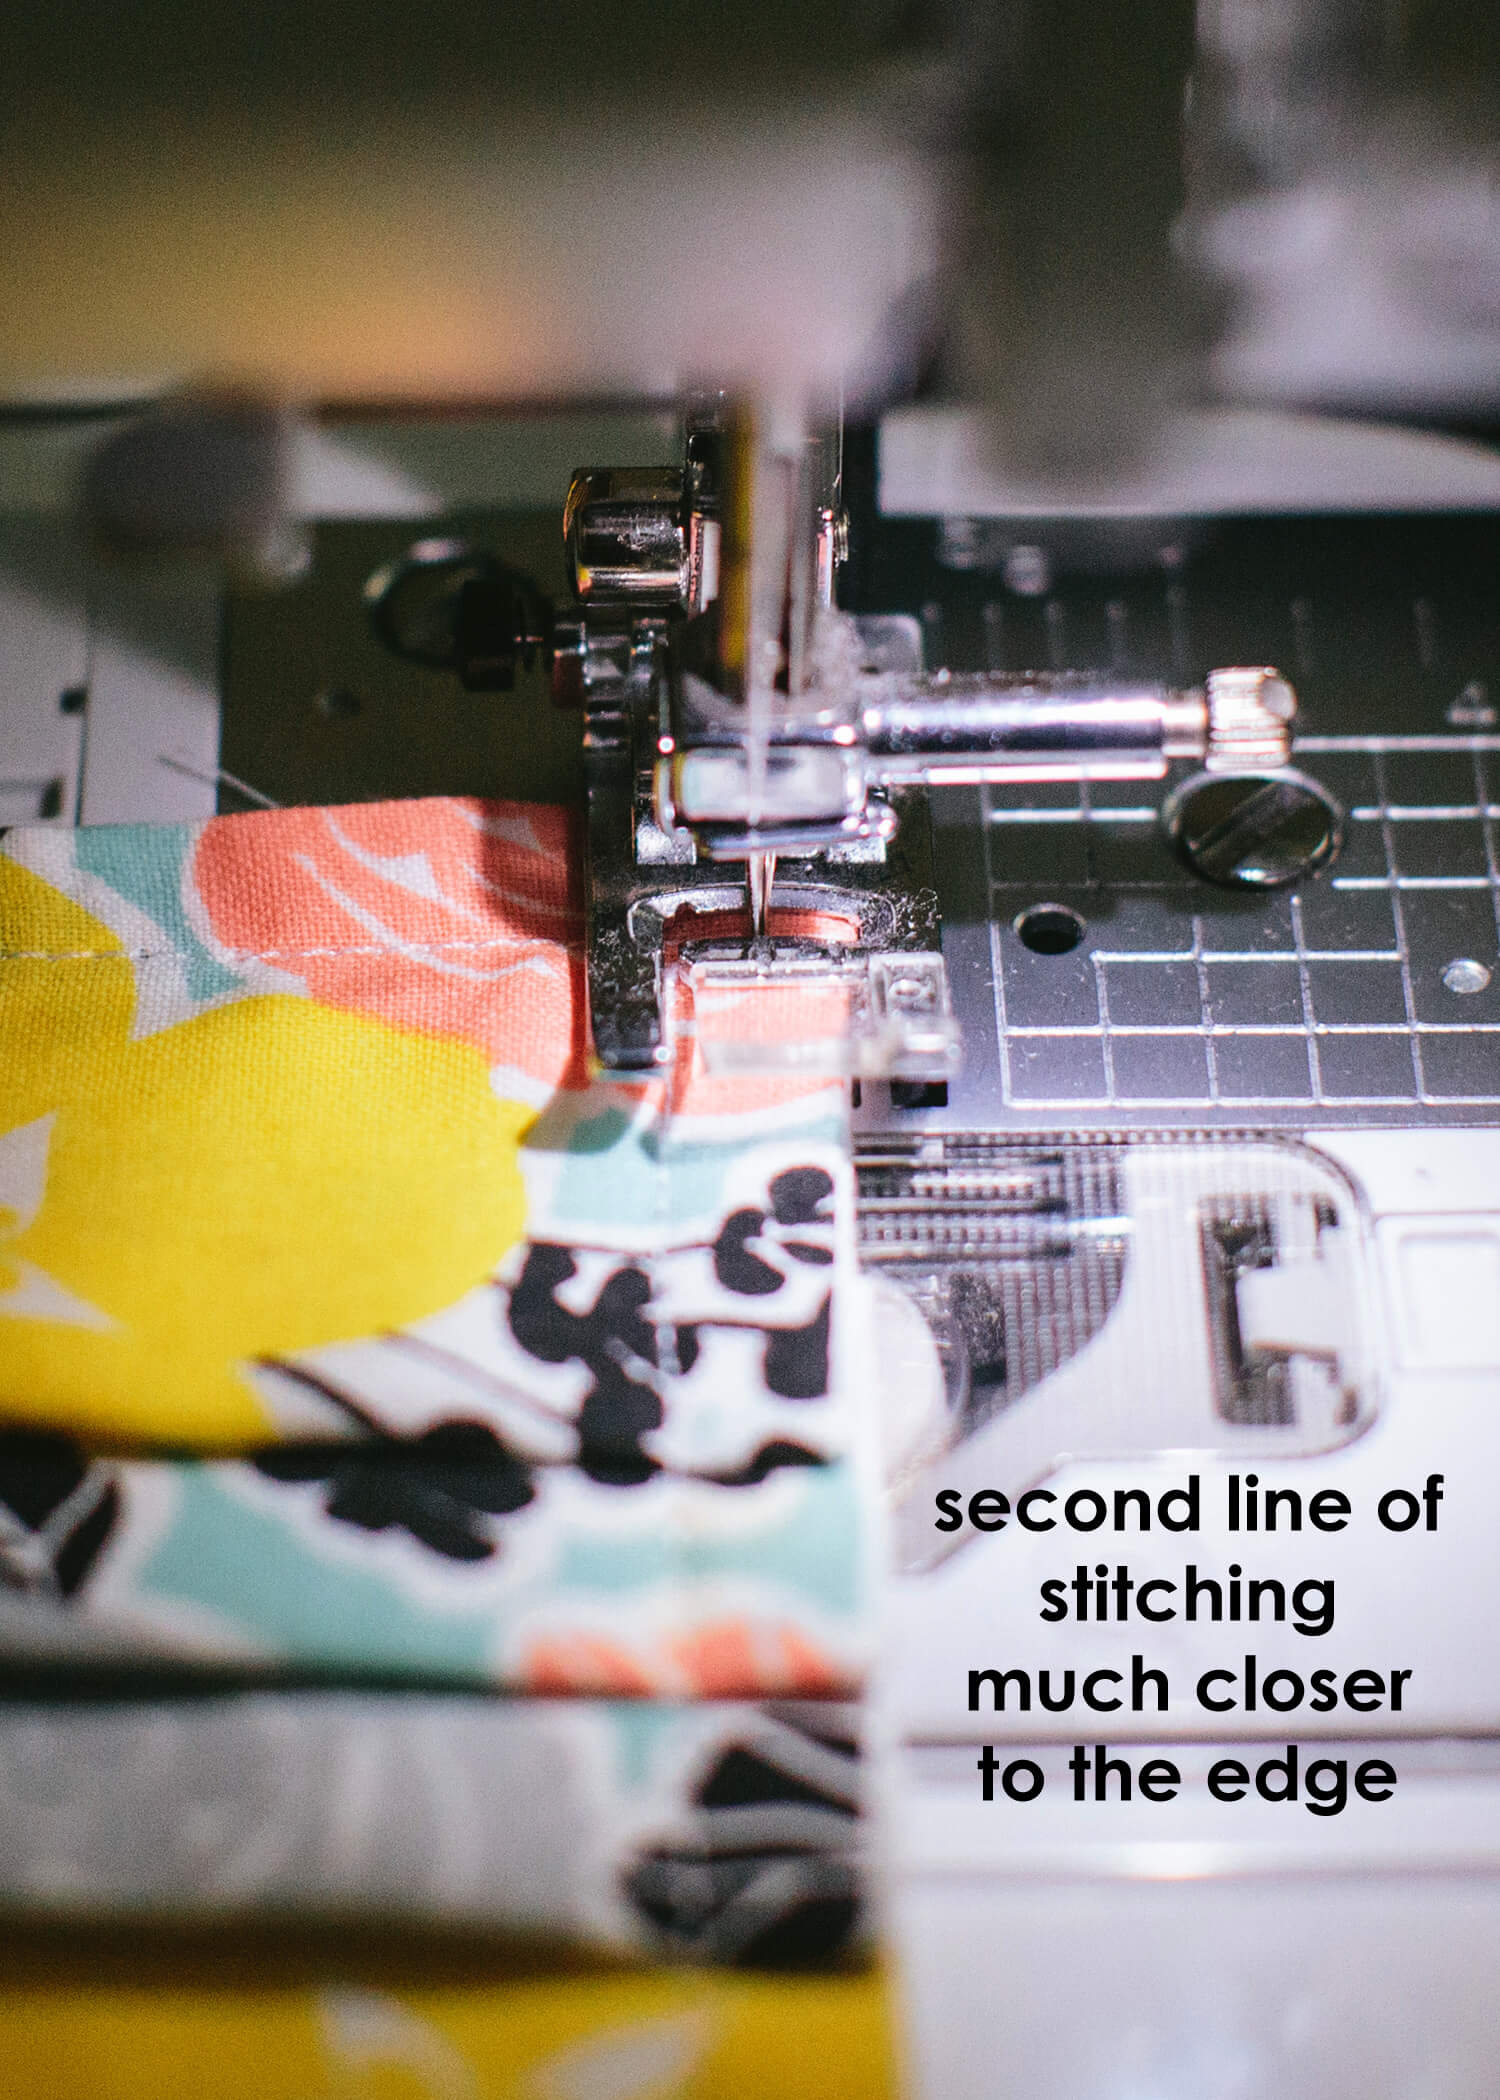
9. To finish your mask, sew around the edge of your mask twice. I like to start in a corner and sew the first line of stitching about 3/8″ from the edge of the mask to secure the pleats (make sure your pleats stay nice and flat as you sew over them). Go all the way around, and when you reach your starting point, continue 3-4 stitches past it, toward the edge of the fabric (see photos below). Leave the needle in the fabric, lift the foot, rotate the mask 90 degrees, and sew a second line of stitching parallel to the first. This line of stitching will be near the edge of the fabric and will neatly close the gap you left open to turn the mask inside out. Once you get back to your starting point, you’re done sewing!
Finished masks (front):
Finished masks (back):
10. I like to launder the masks to make sure the stitching holds up the way it’s supposed to, even if I’m giving the masks away. Use mild detergent with little or no fragrance if you have it. The recipient will probably wash them again (and should), but in the age of the coronavirus, there’s no such thing as “too clean”!
PREPARING TWILL TAPE OR BIAS TAPE TO USE FOR MASK TIES:
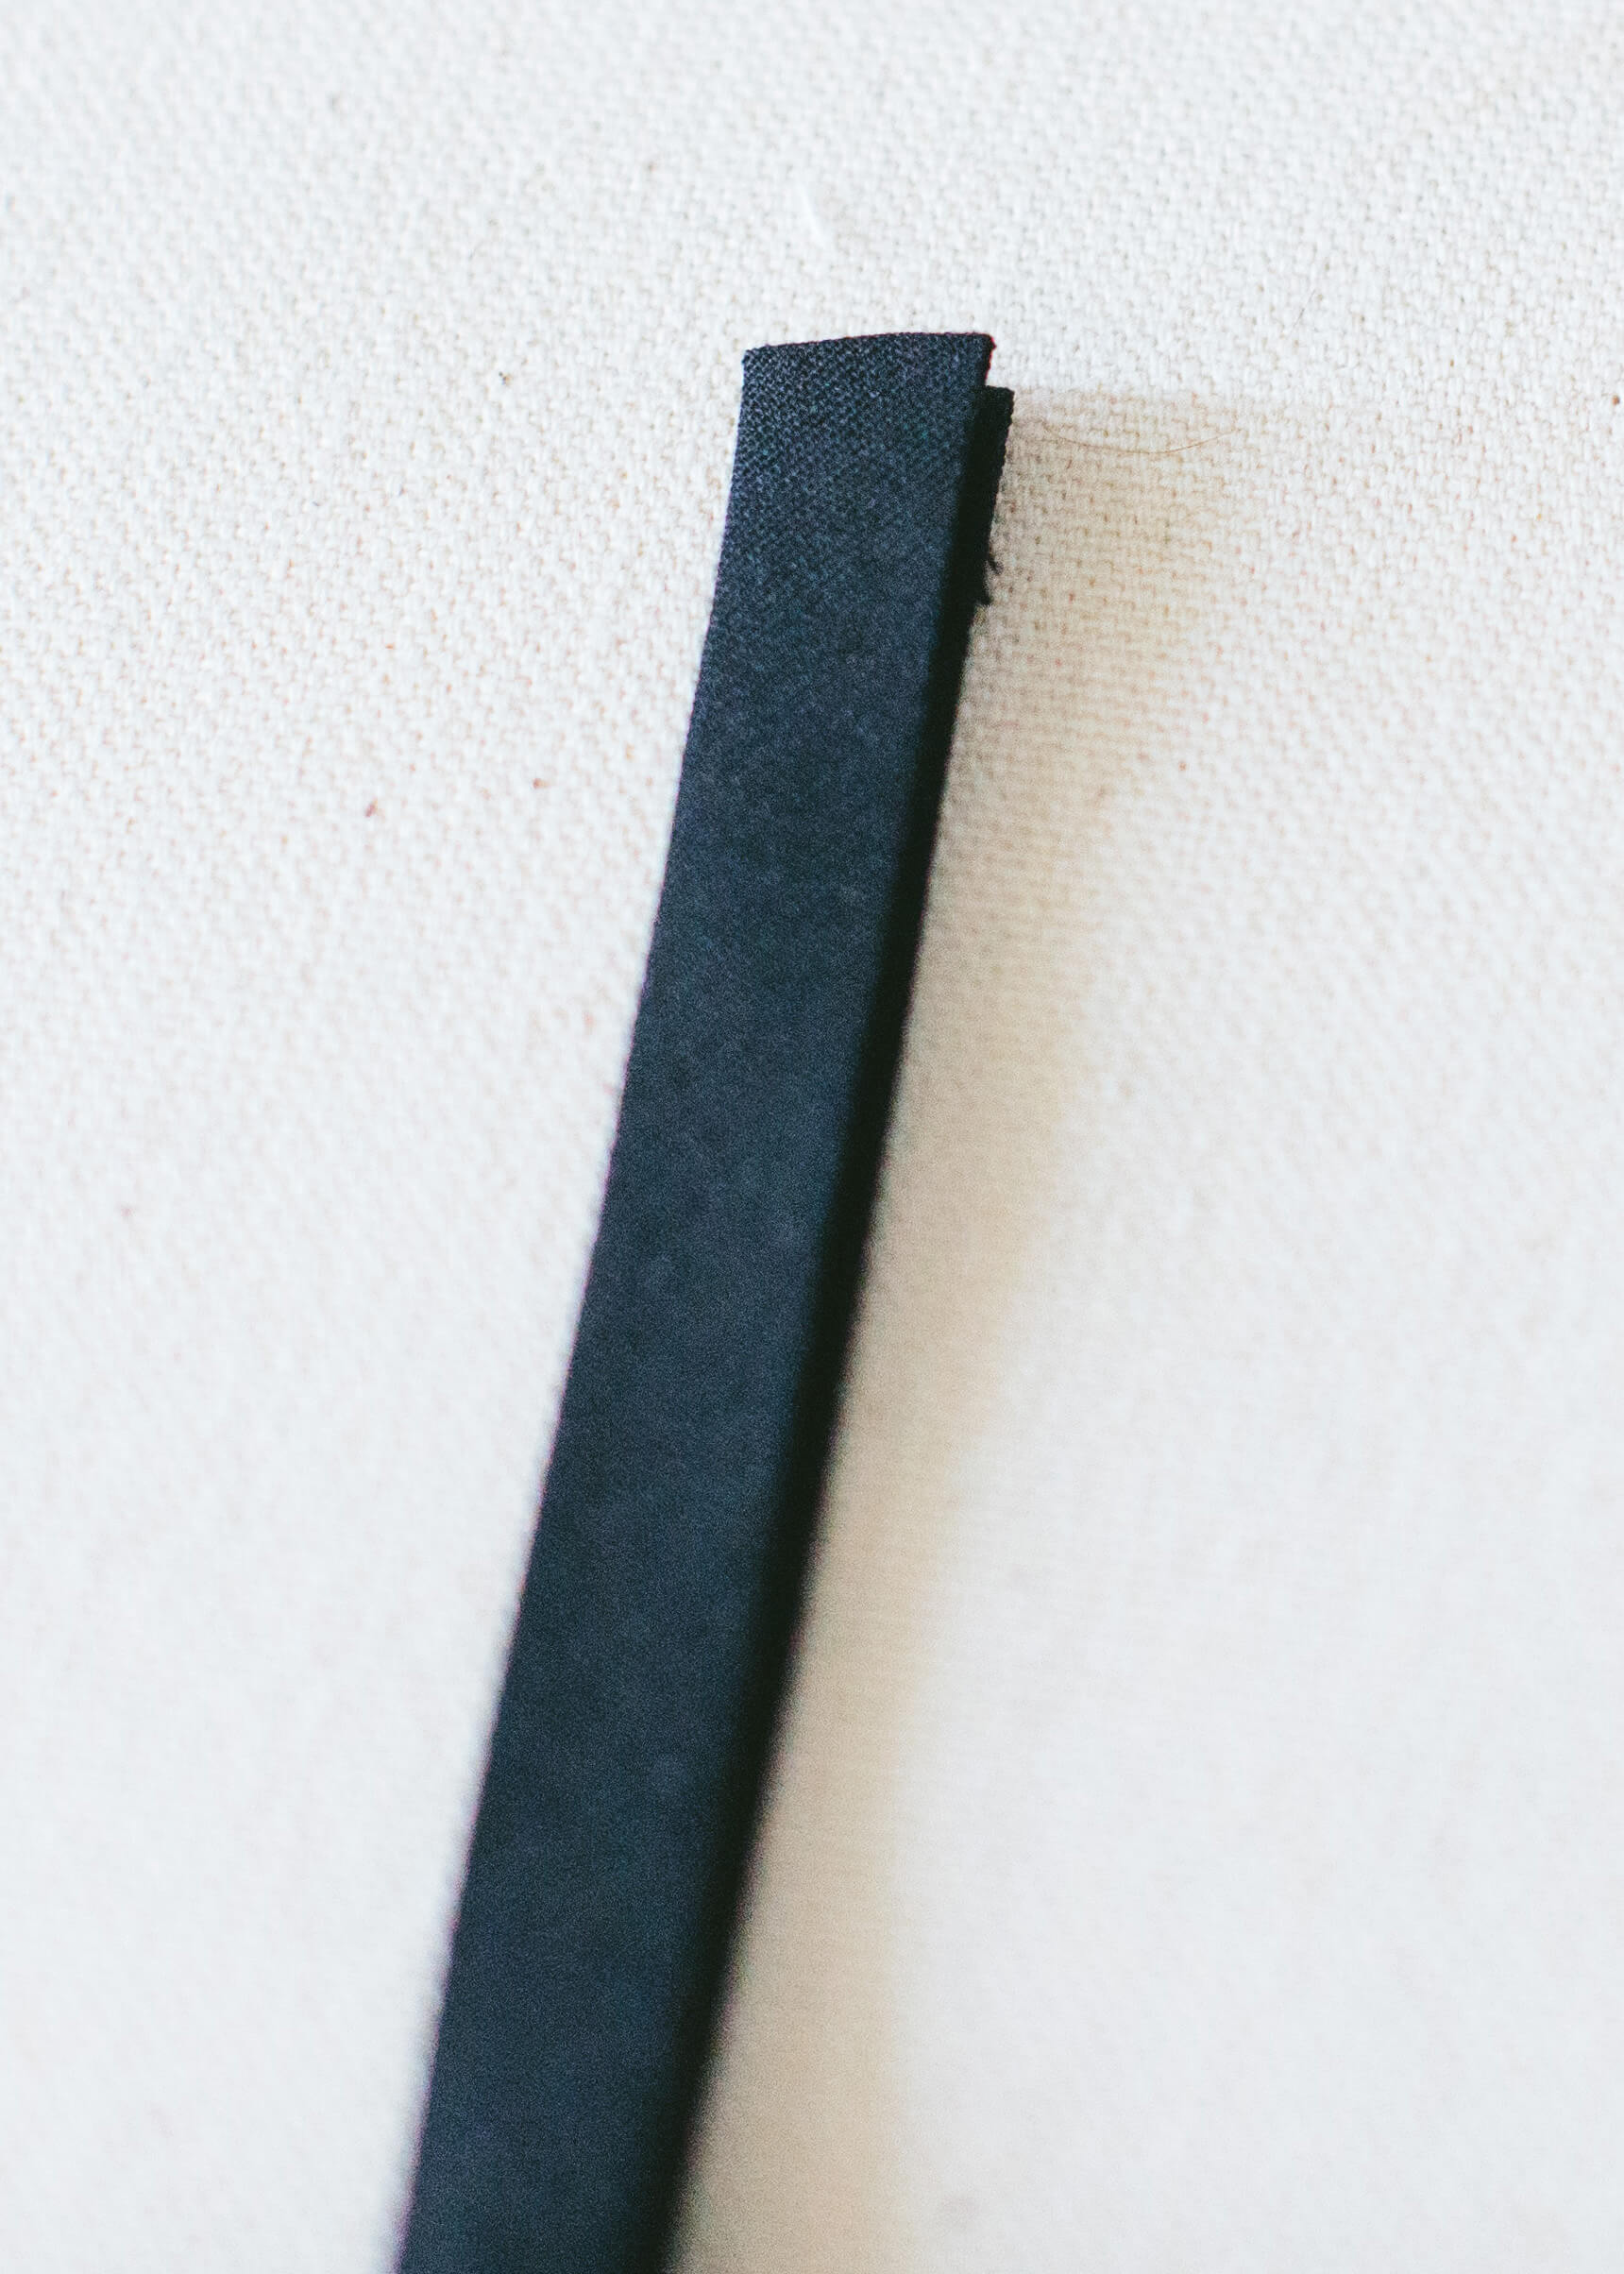
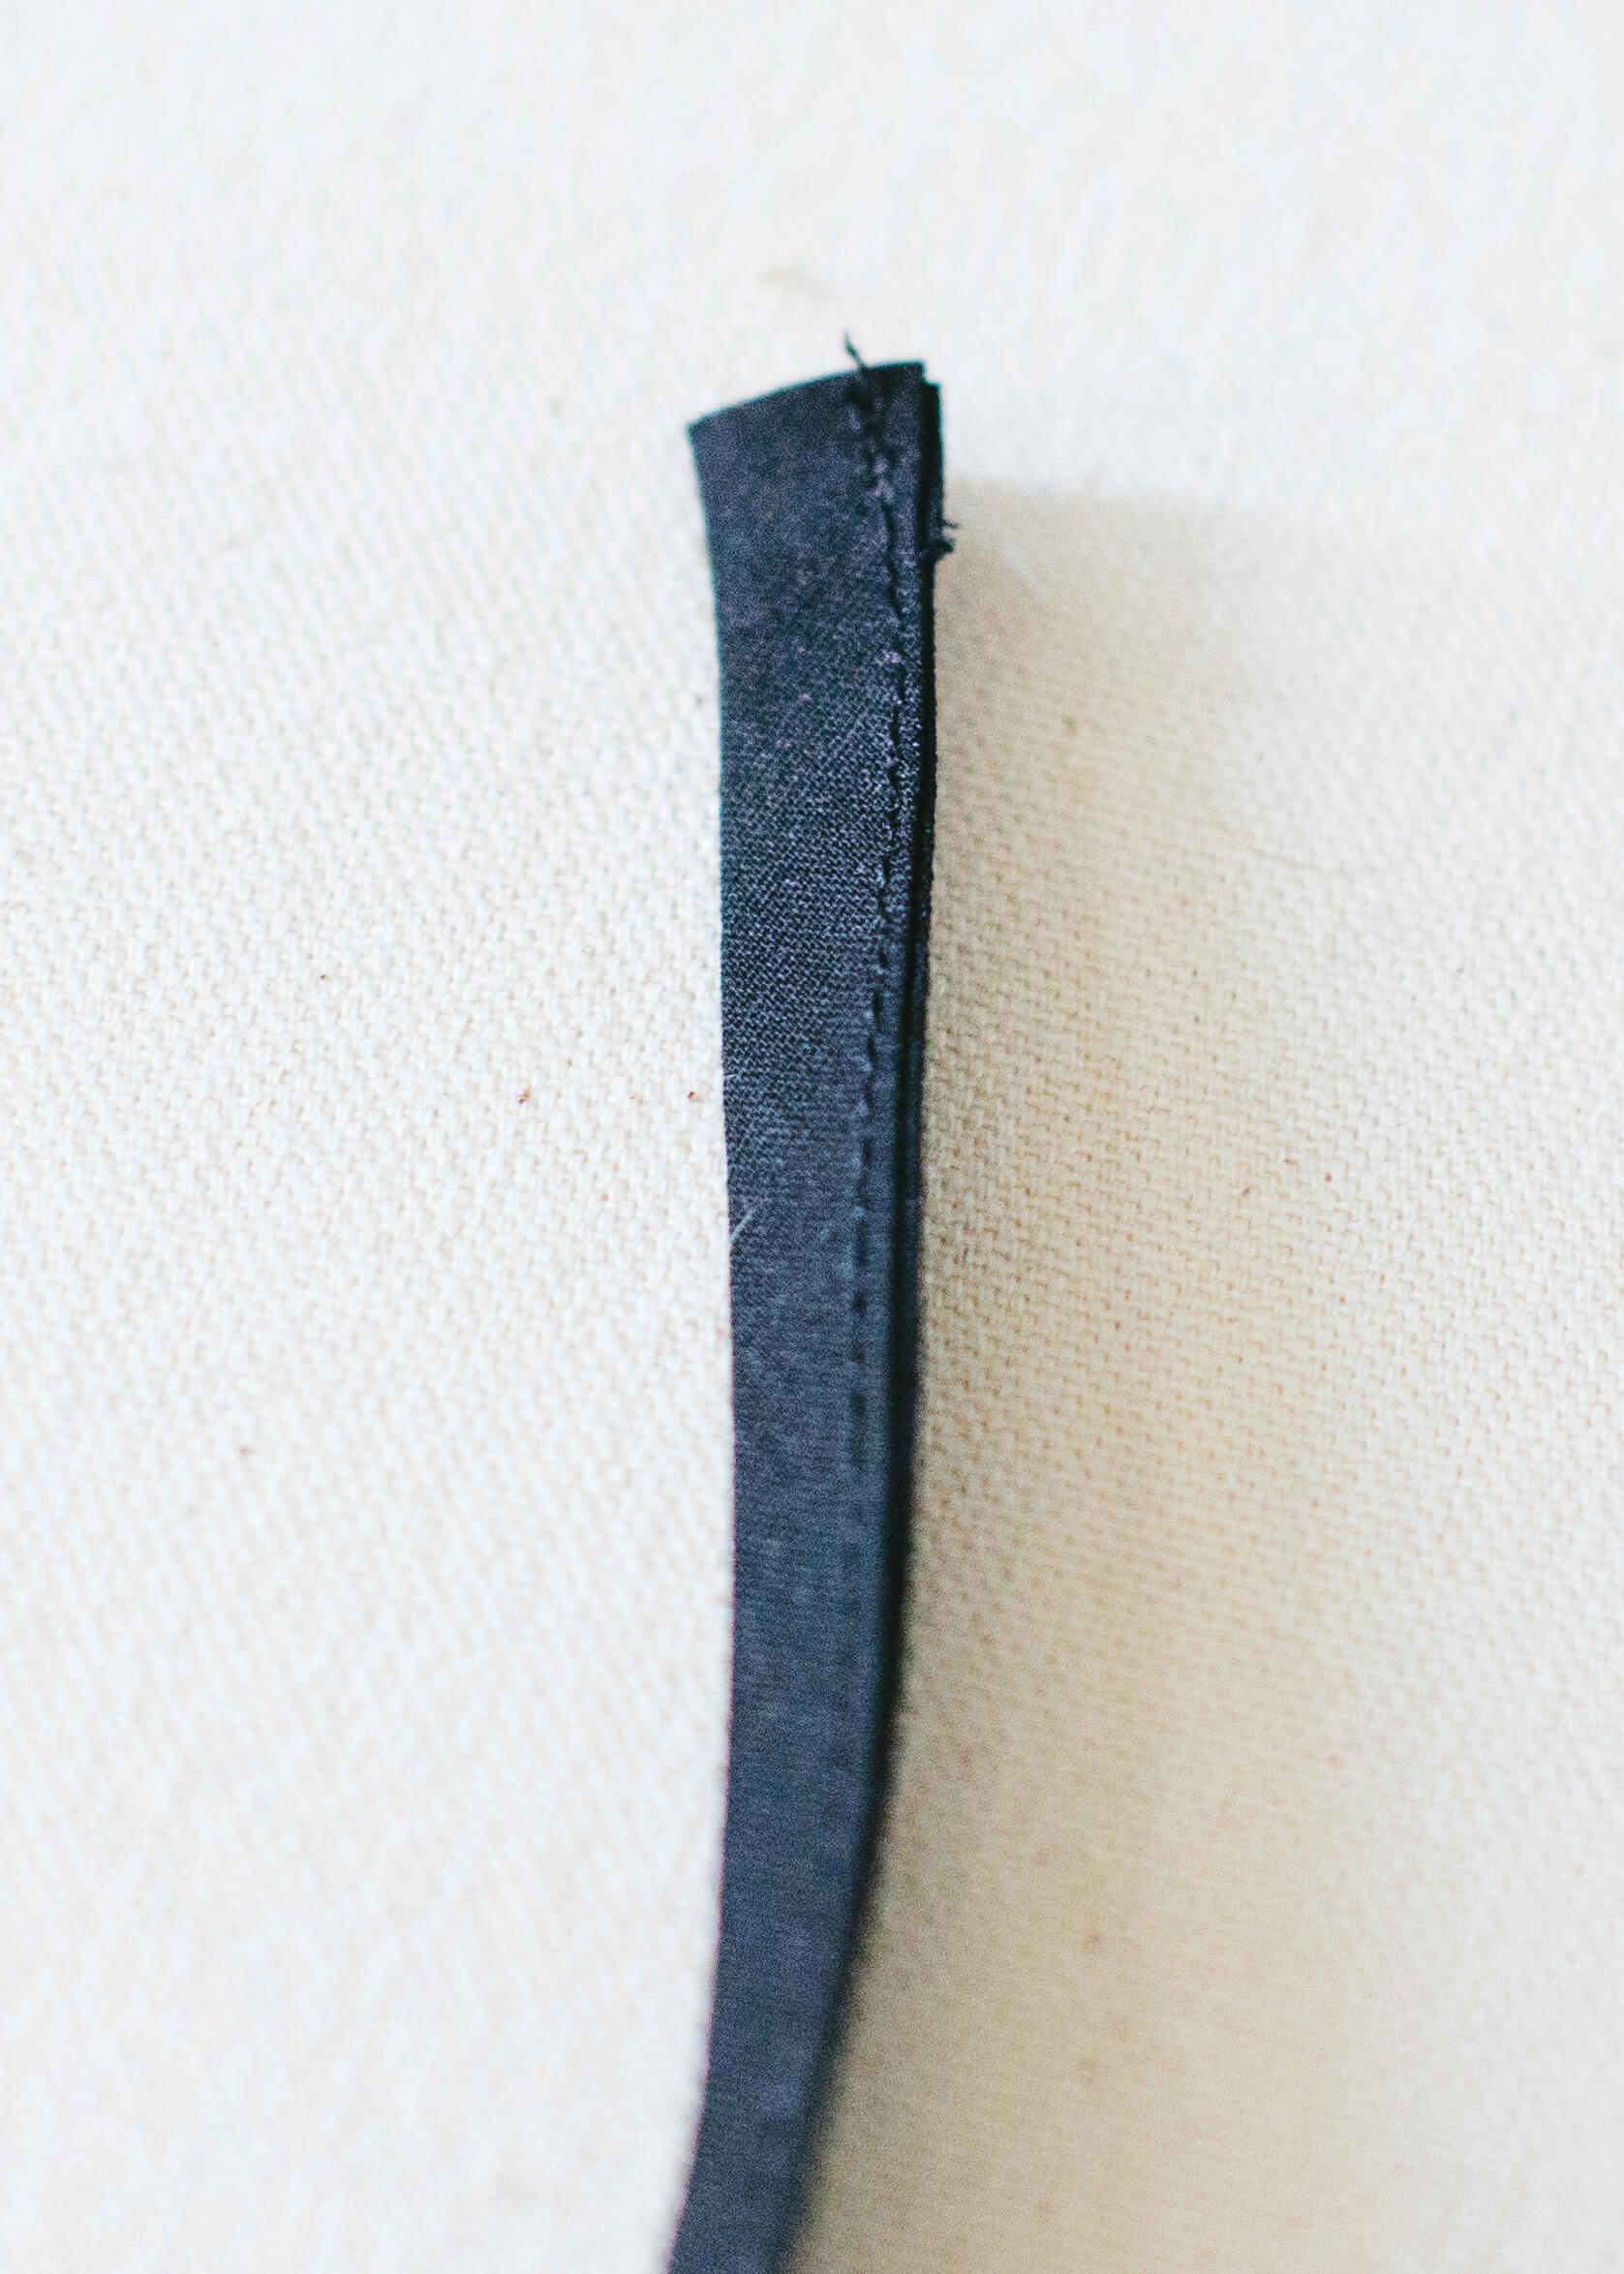
If you’re using twill tape: go ahead and cut the tape to the 18″ lengths called for in the supply list. Fold ONE end of each piece of tape down about 1/4″, then fold it over again. Sew across the folded end to enclose any raw edges (see photo). The opposite end will be enclosed in the seam of the mask, so it doesn’t need to be finished.
If you’re using bias tape: you will need 1/2″ DOUBLE fold bias tape. Go ahead and cut the tape to the 18″ lengths called for in the supply list. Open the folded bias tape up, then fold ONE end down about 1/4″ toward the inside of the bias tape. Finger press it well, then re-fold the tape so that the end you just folded down is now enclosed inside the bias tape. Sew down the entire length of the bias tape, along the open edge to keep it closed (see photos). The unfinished end of the tie will be enclosed in the seam of the mask, so it doesn’t need to be finished.
Hope this was helpful! If you have comments or questions, I’ll do my best to check back regularly and answer them. And if you have any tips or tricks of your own that might make these better, feel free to share!
.jpg)
.jpg)

.jpg)

.jpg)


.jpg)
.jpg)
.jpg)
.jpg)


.jpg)


.jpg)

.jpg)


.jpg)


.jpg)
.jpg)
.jpg)
.jpg)
.jpg)
.jpg)
.jpg)
.jpg)
.jpg)
.jpg)


.jpg)

.jpg)

.jpg)


.jpg)
.jpg)
.jpg)
.jpg)
.jpg)
.jpg)
.jpg)
.jpg)
.jpg)
.jpg)
.jpg) Once you’ve finished folding the pleats, your mask will look something like this:
Once you’ve finished folding the pleats, your mask will look something like this:.jpg)

.jpg)
.jpg)
.jpg)

.jpg)
.jpg)

.jpg)
.jpg)
.jpg)

.jpg)


.jpg)
.jpg)
.jpg)
.jpg)

